logo

OpenClaw Configuration Guide

Website: https://openclaw.ai/ (official website click to jump!)

Source Code Address

The APAC address is the OpenClaw Chinese community repository, suitable for viewing source code and documentation when GitHub access is unstable. For submitting Issues or participating in upstream development, prefer the official GitHub repository.

⚠️ Note Because Clawdbot was renamed, when installing some plugin SDKs, if installation fails, pay attention to changing to OpenClaw

Configuration File Download

openclaw.json (click to download full config file - Windows version)

openclaw.json (click to download full config file - Mac version)

Alibaba Cloud Configuration Tutorial

📖 Official Documentation Alibaba Cloud official configuration tutorial: https://help.aliyun.com/zh/model-studio/openclaw

Configure JSON file

Use the following JSON configuration template, replace the text in the tutorial with the text below, and replace with your own key:

"models": {
  "providers": {
    "claude": {
      "baseUrl": "https://llmoxy.com",
      "apiKey": "sk-xxxxxxx secret key",
      "api": "anthropic-messages",
      "models": [
        {
          "id": "claude-opus-4-6",
          "name": "claude-opus-4-6",
          "reasoning": false,
          "input": ["text"],
          "cost": {
            "input": 0,
            "output": 0,
            "cacheRead": 0,
            "cacheWrite": 0
          },
          "contextWindow": 200000,
          "maxTokens": 8192
        }
      ]
    }
  }
},
"agents": {
  "defaults": {
    "model": {
      "primary": "claude/claude-opus-4-6"
    },
    "models": {
      "claude/claude-opus-4-6": {
        "alias": "claude-opus-4-6"
      }
    }
  }
}

Configuration explanation:

  • Replace sk-xxxxxxx secret key with the actual token obtained from the LLMoxy website
  • baseUrl uses https://llmoxy.com
  • api protocol selects anthropic-messages
  • Model uses claude-opus-4-6

Tencent Cloud Configuration Tutorial

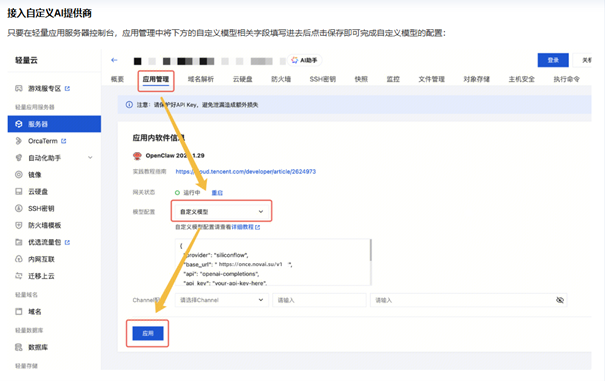
Select custom model configuration in custom server

Open OpenClaw, enter custom server settings, and select the custom model configuration option.

Select custom model configuration

Configure custom JSON file

Use the following JSON configuration template:

{
  "provider": "openai",
  "base_url": "https://llmoxy.com",
  "api": "anthropic-messages",
  "api_key": "<LLMOXY_API_KEY>x",
  "model": {
    "id": "claude-opus-4-6",
    "name": "claude-opus-4-6"
  }
}

Universal configuration template

If you need other models, you can use the following universal template to connect any model compatible with OpenAI/Anthropic (openai-completions/anthropic-messages) protocol:

{
  "provider": "openai",
  "base_url": "https://llmoxy.com",
  "api": "anthropic-messages",
  "api_key": "<LLMOXY_API_KEY>x",
  "model": {
    "id": "claude-opus-4-6",
    "name": "claude-opus-4-6"
  }
}

Parameter explanation:

  • provider: Provider name (can be customized)
  • base_url: API access point
  • api: API protocol type (openai-completions or anthropic-messages)
  • api_key: Your LLMoxy token
  • model.id: Model identifier
  • model.name: Model display name

1. Local Deployment

Install Node.js

Visit nodejs.org to download the LTS long-term support version (strong stability, suitable for development/production environments). The page will automatically recognize your system; just click the download button.

💡 The Node.js installer comes with npm (package manager), no need to download separately.

Install Git

Visit git-scm.com to download and install. For Windows, we recommend the 64-bit version; the default options during installation are basically sufficient.

Verify installation

After installation, open a command line (CMD/PowerShell for Windows, Terminal for Mac/Linux), enter the following commands respectively, and if version numbers are displayed, installation is successful:

node -v
npm -v

Install OpenClaw

npm i -g openclaw

2. Core Configuration Process

Locate configuration file

OpenClaw configuration is in openclaw.json. Please find it according to your operating system:

Operating SystemDefault Path
WindowsC:\Users\<Your_Username>\.openclaw\openclaw.json
macOS / Linux~/.openclaw/openclaw.json

Add custom provider (key step)

In the configuration file, add the following JSON code snippet to the models.providers block. Choose configuration according to your needs:

"models": {
  "providers": {
    "claude": {
      "baseUrl": "https://llmoxy.com",
      "apiKey": "sk-xxxxxx Your LLMoxy API Key",
      "api": "anthropic-messages",
      "models": [
        {
          "id": "claude-opus-4-6",
          "name": "claude-opus-4-6",
          "reasoning": false,
          "input": ["text"],
          "cost": {
            "input": 0,
            "output": 0,
            "cacheRead": 0,
            "cacheWrite": 0
          },
          "contextWindow": 200000,
          "maxTokens": 8192
        }
      ]
    }
  }
}

Add agents.defaults (key step)

You also need to tell OpenClaw to prioritize using this node. Configure corresponding defaults according to the Provider selected above:

"agents": {
  "defaults": {
    "model": {
      "primary": "claude/claude-opus-4-6"
    },
    "models": {
      "claude/claude-opus-4-6": {
        "alias": "claude-opus-4-6"
      }
    }
  }
}

Configuration File Download

In the configuration file, add the following JSON code snippet to the models.providers block:

📦 openclaw.json (click to download full config file - Windows version)

📦 openclaw.json (click to download full config file - Mac version)

3. Launch Service

Launch gateway service

openclaw gateway

Open link

You also need to tell OpenClaw to prioritize using this node:

  • URL: http://localhost:18789

💡 Tip Please use a token from the auto group. For detailed configuration steps, please watch the video tutorial above.

Environment Variable Configuration (Alternative)

If you do not use CC-Switch or configuration files, you can set environment variables directly.

OpenClaw address includes /v1.

[Environment]::SetEnvironmentVariable("OPENAI_BASE_URL","https://llmoxy.com/v1","User")
[Environment]::SetEnvironmentVariable("OPENAI_API_KEY","Your LLMoxy API Key","User")

Close PowerShell and open a new window, then verify:

echo $env:OPENAI_BASE_URL

Should display: https://llmoxy.com/v1

~/.zshrc is the macOS Shell configuration file, loaded automatically every time a terminal opens. The following commands will automatically create (if not exists) and append configuration; just copy and paste into the terminal to run.

{
echo ''
echo '# LLMoxy (OpenClaw)'
echo 'export OPENAI_BASE_URL="https://llmoxy.com/v1"'
echo 'export OPENAI_API_KEY="Your LLMoxy API Key"'
} >> ~/.zshrc

Apply configuration:

source ~/.zshrc

Verify:

echo "$OPENAI_BASE_URL"

Should display: https://llmoxy.com/v1

Not sure which Shell you are using? Run echo $SHELL, seeing /bin/bash means Bash, seeing /bin/zsh means Zsh.

~/.bashrc (Bash) and ~/.zshrc (Zsh) are Shell configuration files, loaded automatically every time a terminal opens. The following commands will automatically create (if not exists) and append configuration; just copy and paste to run.

Bash users (default on most Linux):

{
echo ''
echo '# LLMoxy (OpenClaw)'
echo 'export OPENAI_BASE_URL="https://llmoxy.com/v1"'
echo 'export OPENAI_API_KEY="Your LLMoxy API Key"'
} >> ~/.bashrc

Zsh users:

{
echo ''
echo '# LLMoxy (OpenClaw)'
echo 'export OPENAI_BASE_URL="https://llmoxy.com/v1"'
echo 'export OPENAI_API_KEY="Your LLMoxy API Key"'
} >> ~/.zshrc

Apply configuration:

source ~/.bashrc # Bash users
# or
source ~/.zshrc # Zsh users

You must replace Your LLMoxy API Key with the real Key copied from the LLMoxy Console.

We recommend creating a separate Key for OpenClaw to avoid mixing with personal tools.